fuelphp 高級表單編程
fuelphp 通過 fieldset 和 fieldset_field 類提供高級表單編程。 fieldset 提供了一種面向對象的方式來創建表單。它完全支持模型。它還內置了對客戶端和服務器端驗證的支持。要創建一個完整的表單,創建一個具有適當表單和驗證設置的模型就足夠了。讓我們在本章中了解 fieldset 類以及如何使用它創建表單。
字段集
fieldset 是 fieldset_field 對象的集合。 fieldset_field 定義了表單的單個條目,例如名字、姓氏等以及驗證。 fieldset 類具有添加/編輯/刪除字段的方法。它具有識別模型中定義的字段并從給定模型創建字段的選項。 fieldset 在后臺使用 form 和 validation 類來做真正的工作。讓我們看看 fieldset 類的一些重要方法。
forge
forge 創建一個新的 fieldset 實例。它有以下兩個參數:
- $name-字段集的標識符
- $config-配置數組。可能的選項是 validation_instance 和 form_instance。 validation_instance 可以有 validation 對象,form_instance 可以有 form 對象。
$employee_form = fieldset::forge('employee');
實例
instance 通過標識符返回之前創建的 fieldset 實例。
$employee_form = fieldset::instance('employee');
get_name
獲取字段集實例的標識符。
$employee_form = fieldset::forge('employee');
$name = $employee_form->get_name();
add
add 創建一個新的 fieldset_field 實例并將其添加到當前字段集。它包含以下四個參數,
- $name-字段名稱
- $label-字段標簽
- $attributes-html 標簽屬性
- $rules-驗證規則
$employee_field = $employee_form-> add (
   'employee_lastname',
   'lastname',
   array ('class' => 'pretty_input')
);
// with validation rules
$employee_form->add (
   'email', 'e-mail',
   array('type' => 'email', 'class' => 'pretty_input'),
   array('required', 'valid_email')
);
add_before
add_before 與 add 類似,只是它有一個額外的參數來指定新創建的字段將添加到哪個字段之前。
$employee_form->add_before (
   'employee_firstname',
   'firstname',
   array ('class' => 'pretty_input'),
   array(),
   'employee_lastname'
);
delete
delete 從字段集中刪除指定的字段。
$employee_form->delete('employee_firstname');
field
field 從字段集中獲取所有字段或指定的字段。
$fields = $employee_form->field();
$lastname_field = $employee_form->field('employee_lastname');
build
build 是 $this->form()->build() 的別名。生成表單的 html 標記。
$employee_form->build(uri::create('employee/add'));
enable
enable 重新啟用先前已禁用的字段。
$employee_form->enable('employee_firstname');
disable
disable 允許禁止構建字段集中的字段。
$employee_form->disable('employee_firstname');
form
form 返回當前字段集的 form 實例。
$form = employee_form->form();
add_model
add_model 將模型的字段添加到字段集中。它有以下三個參數,
- $class-類名
- $instance-用值填充字段的類的實例
- $method-類中方法的名稱。此方法用于將字段添加到字段集中。 orm\model 具有所需的方法。默認方法名稱是 set_form_fields。
$employee_form = fieldset::forge('employee');
$employee_form->add_model('model_employee');
populate
populate 使用模型實例設置字段集中字段的初始值。
$emp = new model_employee();
$emp->name = "jon";
$employee_form->populate($emp);
repopulate
repopulate 與 populate 相同,只是它重新填充字段集中的字段。
validation
validation 獲取當前字段集的驗證實例。
$validation = $employee_form->validation();
validated
$this->validation()->validated() 的別名。
input
$this->validation()->input() 的別名。
error
$this->validation()->error() 的別名。
show_errors
$this->validation()->show_errors() 的別名。
工作示例
讓我們創建一個高級表單,使用 fieldset 類在我們的示例員工應用程序中添加新員工。
更新模型
使用必要的驗證規則更新員工模型,并按如下方式添加驗證觀察者。
   class model_employee extends orm\model {
      protected static $_connection = 'production';
      protected static $_table_name = 'employee';
      protected static $_primary_key = array('id');

      protected static $_properties = array (
         'id',
         'name' =--> array (
            'data_type' => 'varchar',
            'label' => 'employee name',
            'validation' => array (
               'required',
               'min_length' => array(3),
               'max_length' => array(80)
            ),
            'form' => array (
               'type' => 'text'
            ),
         ),
         'age' => array (
            'data_type' => 'int',
            'label' => 'employee age',
            'validation' => array (
               'required',
            ),
            'form' => array ('type' => 'text' ),
         ),
      );

      // just add the observer, and define the required event
      protected static $_observers = array('orm\\observer_validation' => array (
         'events' => array('before_save')));
   }
這里,我們定義了 name 和 age 字段的驗證規則,并添加了一個新的觀察者來執行服務器端驗證,然后將模型保存到數據庫中。相同的驗證規則也會在表單中創建必要的輸入驗證屬性。
創建表單
在員工控制器中創建新動作 action_advancedform,如下所示。
public function action_advancedform() {

   // create a new fieldset and add employee model
   $fieldset = fieldset::forge('employee')->add_model('model_employee');

   // get form from fieldset
   $form = $fieldset->form();

   // add submit button to the form
   $form->add('submit', '', array('type' => 'submit', 'value' => 'submit'));

   // build the form  and set the current page as action
   $formhtml = $fieldset->build(uri::create('employee/advancedform'));

   // set form in data
   $data = array();
   $data['form'] = $formhtml;
   return response::forge(view::forge('employee/advancedform', $data, false));
}
在這里,我們使用 fieldset 創建了表單并將表單發送到視圖。接下來,為動作添加視圖, fuel/app/views/employee/advancedform.php,如下所示。
      <title>employee :: add page</title>
      <meta charset="utf-8">
      <meta name="viewport" content="width = device-width, initial-scale = 1">
       echo asset::css('bootstrap.css');

      <style>
         table {
            width: 90%;
         }
         table tr {
            width: 90%
         }
         table tr td {
            width: 50%
         }
         input[type = text], select {
            width: 100%;
            padding: 12px 20px;
            margin: 8px 0;
            display: inline-block;
            border: 1px solid #ccc;
            border-radius: 4px;
            box-sizing: border-box;
         }
         input[type = submit] {
            width: 100%;
            background-color: #3c3c3c;
            color: white;
            padding: 14px 20px;
            margin: 8px 0;
            border: none;
            border-radius: 4px;
            cursor: pointer;
         }
         div {
            border-radius: 5px;
            background-color: #f2f2f2;
            padding: 20px;
         }
      </style>


            if(isset($errors)) {
               echo $errors;
            }
            echo $form;
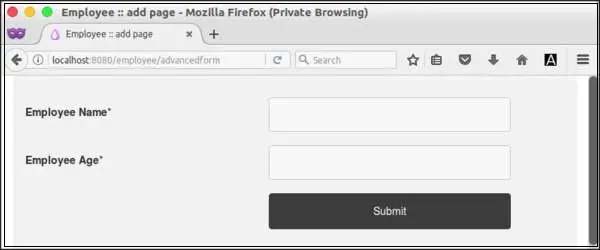
現在,請求頁面 http://localhost:8080/employee/add 將顯示以下表單。

流程表格
更新action方法, action_advancedform來處理表單,將用戶輸入的員工數據添加到員工控制器的數據庫中,如下所示。
public function action_advancedform() {

   // create a new fieldset and add employee model
   $fieldset = fieldset::forge('employee')->add_model('model_employee');

   // get form from fieldset
   $form = $fieldset->form();

   // add submit button to the form
   $form->add('submit', '', array('type' => 'submit', 'value' => 'submit'));

   // build the form  and set the current page as action
   $formhtml = $fieldset->build(uri::create('employee/advancedform'));

   if (input::param() != array()) {
      try {
         $article = model_employee::forge();
         $article->name = input::param('name');
         $article->url = input::param('age');
         $article->save();
         response::redirect('employee/list');

      }
      catch (orm\validationfailed $e) {
         $view = view::forge('employee/advancedform');
         $view->set('form', $formhtml, false);
         $view->set('errors', $e->getmessage(), false);
      }
   }

   return response::forge($view);
}
在這里,我們被重定向到員工列表頁面,一旦用戶輸入的數據被驗證并保存到數據庫中。否則,我們將再次顯示該表單。
創建表單
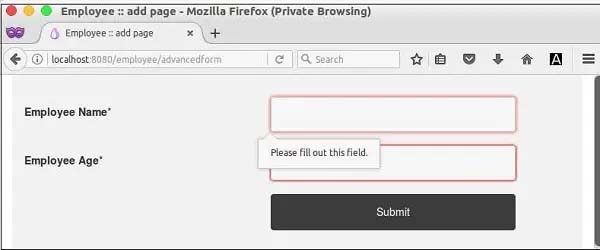
現在,請求 url, http://localhost:8080/employee/add 并輸入一些員工數據并提交表單。如果未提供數據,則表單將提示用戶輸入數據,如下面的屏幕截圖所示。

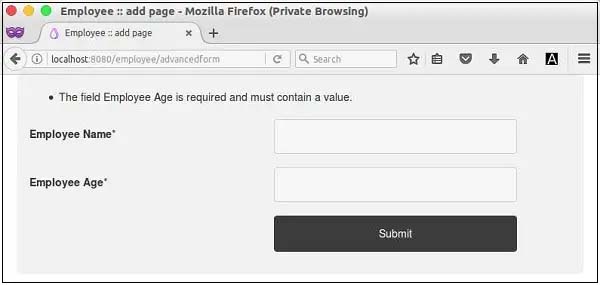
如果用戶繞過客戶端驗證,則服務器將驗證表單并顯示錯誤,如下面的屏幕截圖所示。

如果數據通過客戶端和服務器端驗證,那么員工數據將被保存到數據庫中,頁面被重定向到列表頁面。


